With the Google Assistant SDK being released, speech-based home projects received a powerful new component in its arsenal and with this I thought it’s about time for me to jump on the home assistant hype train!
The Google Assistant will be implemented on a Raspberry Pi, which makes it a potentially more powerful and much cheaper system than the Google Home device and along with fun and joy we will hopefully learn a thing or two.
This project contains a variety of features among which are:
- Google Assistant running on a Raspberry Pi (covered in this post)
- Use a bluetooth remote to initiate request to Google Assistant (link)
- Execute shell commands with Google Assistant + IFTTT + Home Assistant with voice commands (link)
- Control home devices and ceiling lights with voice commands (link)
If you want to use this post as a guide or inspiration for your own projects, I am going to assume that you are already somewhat familiar with Linux systems and the Raspberry Pi, although I will try to mention all important details on what I did. Alright, let’s get right to it!
Overview

A quick overview on what components I used for this setup:
- Raspberry Pi 3 Model B running Raspbian Jessie
- Speakers with 3.5mm jack
- Microphone with 3.5mm jack
- 3.5mm to USB audio adapter to plug the mic into the Raspberry Pi
- Notebook running OSX 10.11
- at least one finger
Step 1: Preparation & SSH connection
To start off, we first need to install the Google Assistant on a Raspberry Pi which will be the main focus of this post. Google provides a great guide for the installation, I started off here.
Conveniently, I already have a Raspberry Pi 3 Model B with Raspbian Jessie installed which I use for my home surveillance system. I will access my headless Raspberry Pi via SSH, so except for the power supply no additional wiring will be necessary for now, when using the WiFi connection - gotta save the cable clutter for later!
With the option to comfortably control the Raspberry Pi from my notebook, I connect to it via SSH in Terminal.
Step 2: Audio configuration
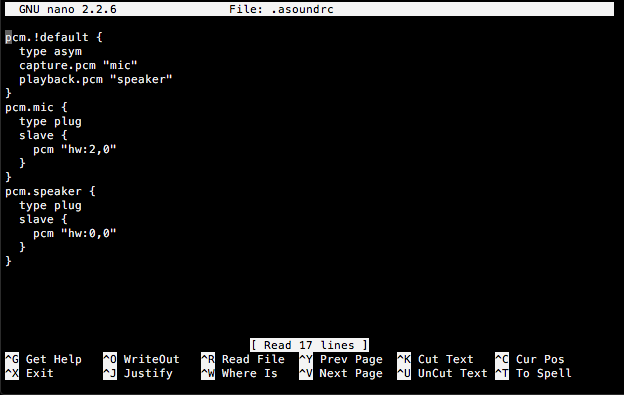
The audio input and output can be set by editing the file ~/.asoundrc.
With the commands arecord -l and aplay -l, we can find the card/device numbers of the desired input and output devices respectively:

Choosing my USB dongle as input and the 3.5mm jack as output, my .asoundrc file is changed accordingly:
$ speaker-test -t wav # test output
$ arecord --duration=5 -f S16_LE --rate=16k ~/test.wav # test input
$ aplay ~/test.wav # check recording
All good? Onwards!
Step 3: Create Google Developer Project & configure Google account
This step is fairly straight-forward: follow this
We need to create a Google Developer Project, grant the Raspberry Pi access to the Google Assistant API by downloading a client secret JSON file. Since I downloaded the JSON file on my notebook, I have to transfer the file on my Raspberry Pi via SFTP (e.g. using FileZilla) or alternatively by simply executing in the Terminal:
$ scp <path to file>/client_secret_<client-id>.json pi@<raspberry-pi-ip-address>:/home/pi/
After enabling all necessary activity controls, we arrive at the final step.
Step 4: Install Google Assistant SDK and run demo
Again, the guide is quite thorough in the last step. If the Assistant responds to the voice command Hey Google or Ok Google, we are ready to proceed to the next exciting part: Start a conversation with a bluetooth remote
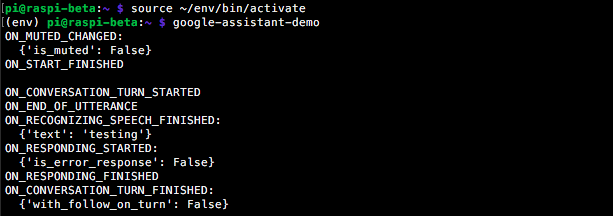
If you later want to come back and test the Assistant, execute on the Raspberry Pi:
$ source ~/env/bin/activate
$ google-assistant-demo
Feel free to post questions/comments/suggestions and let me know if you run into any trouble!
Leave a Comment
Your email address will not be published. Required fields are marked *